
Your one-stop guide to everything you ever wanted to learn about how to use a Moccamaster drip coffee maker. Welcome! This is your one-stop guide to everything you ever wanted to learn about the Moccamaster drip coffee maker. I’ve written it for beginners in mind, so if you’ve never touched a Moccamaster before, this is the article specially designed for you.
We’ll get into a short overview of the different Moccamaster model options out there. Then, the bulk of this crash course will be dedicated to teaching you how to use a Moccamaster. For the intermediate brewers, I’ll also share some of my best tips and tricks to improve your brew. Lastly, we’ll have fun with exploring different recipes you can craft just for yourself.
In your journey to perfecting the Moccamaster brew, you might also be intrigued by other unique coffee experiences, such as the enchanting flavors offered by Melbourne’s magic coffee, a blend that’s gaining popularity among coffee aficionados.
How Good Is It?
The Moccamaster is made by a Dutch company called Technivorm – they are one of the most trusted and reputable coffee companies in the world. Every single Moccamaster is crafted and handmade in the Netherlands, with all parts sourced from and manufactured in Europe.
“I want to create the best cup of coffee with a coffee maker that lasts a lifetime. A Moccamaster should be the last brewer you’ll ever buy.”
Gerard Clement Smit, Moccamaster founder
And I think the man has succeeded! The Moccamaster is certified by the Specialty Coffee Association of America (SCA) and holds the prestigious Seal of Approval from the European Coffee Brewing Centre. It’s not easy for any old Walmart coffee maker to get this.
In simple words, a coffee maker needs to produce the same, high-standard quality coffee again and again, multiple times in a row. Whilst meeting strict temperature, time and taste requirements every single time.
Wanna know how difficult it is to get SCA certified? Read the SCA’s “pillars of coffee preparation” here. It’s quite an in-depth article, so be warned.
So not only are you getting super fast coffee (about 5 minutes), it’s guaranteed to be top-of-the-line quality coffee. In fact, while the Moccamaster is designed for home use, it’s so good it’s been used in countless international coffee championships!
Different Moccamaster Models?
When you pop onto Moccamaster’s website, you’ll find that they have many different models available. Some are 10-cup coffee makers, some are professional models that make a massive 15 cups of coffee, and some make just one cup of drip coffee.
If you’re considering buying one, the best strategy is to decide how many cups of coffee you’re most likely to brew daily. Have a family of four? The 8-cup KBS Moccamaster model works best. Living by yourself? The single serve Moccamaster Cup-One is plenty.
For this tutorial, we’ll be using the most popular model out there: the 1.25 Litres/10 Cups Moccamaster.
- There are many sub-models, like the KGBT, the KGB Select, etc., but don’t worry about this jargon. To brew great tasting coffee, it’s the same step-by-step process.
Now, you have your Moccamaster in front of you? That’s not all you need – let’s ready our checklist of what else we need.
What You’ll Need
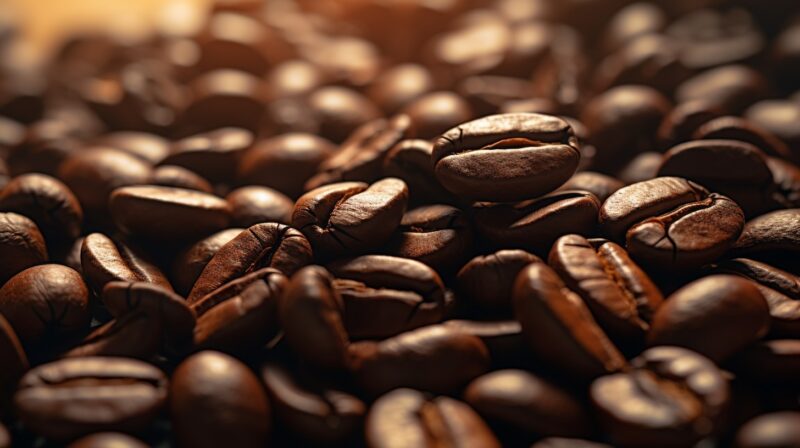
Coffee Beans
- Freshly roasted whole coffee beans, thank you very much. I’ve written an entire article battling whole beans versus pre-ground coffee, so let’s not get into it here.
- I would suggest getting a single origin coffee, as the Moccamaster excels at bringing out the clear, bright flavours of a coffee’s origin. You really get to taste the unique characteristics of single origin beans, as opposed to a blend.
- Also, light roasted beans would be my recommendation. That way, you ensure the delicate taste notes haven’t been burnt away by too high of a heat during the roasting process. Check out our guide to the different roast levels you can get, and which one suits your taste preference best.
Equipment
- A Moccamaster (obviously): Again, don’t freak out over which specific model you have. This guide will work with all models.
- A burr grinder: This is to get a nice, uniform grind size, which the Moccamaster needs to brew an even coffee.
- Filter papers: Official Moccamaster filter papers come in two sizes: No.1 (for the 1-cup model) and No.4 (for the larger models). Alternatively, you could opt for reusable gold, metal or cloth filters, though, I don’t really like them due to their residual taste.
- Filtered water: This is optional. Regular tap water has what we call “hard” minerals (such as dissolved calcium and magnesium) that can build up and clog your coffee maker. Taste-wise, filtered water is free of any unwanted, harsh minerals, so your coffee should taste softer and cleaner. Barista’s note: There is a great deal of debate as to whether or not filtered water actually makes a difference when it comes to taste. I’ll have an advanced article discuss this another time, but for now, let’s put it this way: if the water you’re using tastes good on its own, and you happily drink it daily, it will be fine for brewing your coffee.
- A carafe: A fancy term for the pot that goes under the coffee maker. Your Moccamaster will come with either a glass or a “thermal” stainless steel one, depending on the specific model. Moccamaster’s Thermal models are better at retaining heat.
- A digital scale: Your kitchen chicken scale won’t work. The scale has to be sensitive enough to weigh tiny changes in the weight of your coffee. If you truly want to enjoy great-tasting coffee, a good scale is a game-changer.
The Recipe Ratio: Part I
Moccamaster’s official formula is:
55 grams of coffee grounds to 1 Litre (1000 mL) of water.
This puts it at around a 1:18 ratio.
We will be strictly using the metric system to measure our Moccamaster brew. Mixing imperial units here is a recipe for disaster. Sorry, dear American friends.
It’s very simple maths. Divide the volume of coffee (mL) you want to brew by 18. That’s the weight of the coffee grounds you’ll need in grams. For example:
- I want to brew 1.25 L (1250 mL) of coffee for my family. Divide 1250 by 18. I’ll need about 69 g of coffee grounds.
- I want to drink half a litre of coffee (500 mL). Divide by 18. I’ll need about 28 g of coffee grounds.
This is the recipe we’ll be using, and that’s all you need to know…for now (cue ominous music).
How to Use a Moccamaster: The 10-Step Tutorial

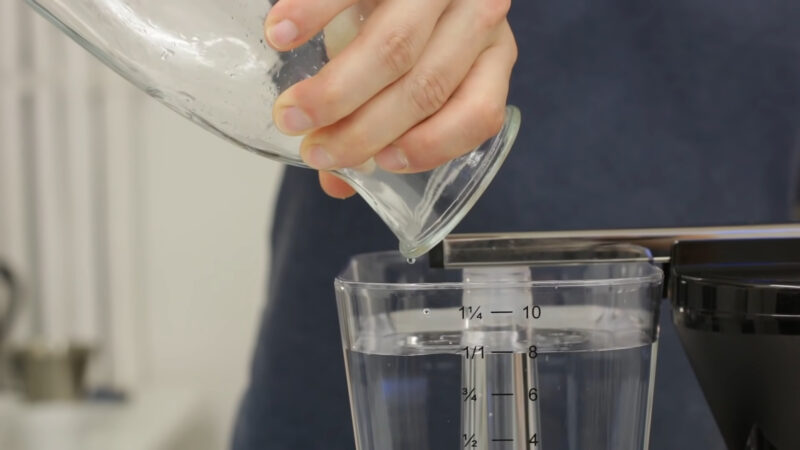
Step 1: Fill the Water Tank
Pour cold, clean water into the water tank of the Moccamaster, up till the desired volume of coffee you want to brew. Don’t use hot water.
The markings on the left side are measured in litres, whilst the right side’s measurements are in cups. “Cups” are too generic. To actually make a good brew, we will use litres. For this tutorial’s recipe, let’s brew exactly 1 L of coffee. On the Moccamaster, that’s the line that says 1/1.
Step 2: Fold the Filter Paper
Take a piece of the filter paper out. Two edges of the filter paper will have rough, little lines. Fold these two edges in. If you don’t, it won’t fit.
Then, open the filter paper and put it into the brew basket. It should fit nice and snug in place.
Step 3: Rinse the Filter Paper
Remove the whole brew basket and rinse it, filter paper and all, under warm water. This will wash away any trace of that undesirable paper taste.
Step 4: Grind Your Coffee
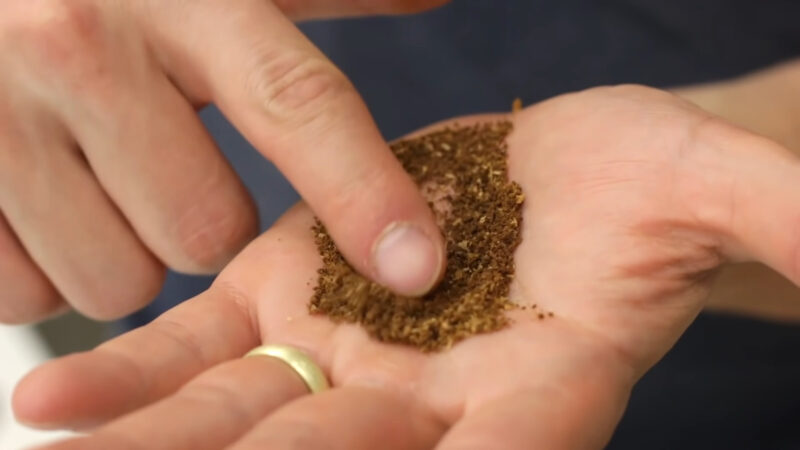
Since we are going to brew a litre of coffee, we’ll be using 55 g of coffee grounds. Use your scale here for maximum accuracy. Grind it to a medium grind size. That’s something close to the size of sand.
Other guides may suggest making it slightly finer or coarser grind than a straight-out medium. I don’t recommend this if it’s your very first time using a Moccamaster. You should absolutely experiment later, but for now, stick to the tried and true recipe.
Add the grounds to the filter paper in the brew basket. Make sure all of the grounds fall into the filter paper, and none get caught between the filter paper and the brew basket wall.
Step 5: Distribute the Coffee Grounds
A very important step!
When you tip the coffee grounds into the filter paper, you want to make sure you get an even bed of coffee grounds. It should look nice and level. This is so that during the brew, water can evenly pass through.
If there’s a giant mountain piled up to one side, gently tap the side of the brew basket to knock the grounds over and distribute them evenly.
Step 6: Set Up the Moccamaster
Replace the brew basket (with the wet filter paper and coffee grounds in it) back in position. Switch the brew basket to the “closed” setting. On the brew basket, this is the “X” inside a circle symbol. This shuts a little valve at the bottom which stops water from flowing out.
- Note: If your Moccamaster model does not have this basket switch, don’t worry about it. Skip this part.
Place your carafe in place under the brew basket.
Step 7: Switch It On
Flick the power switch on! A red light will turn on. That’s how you know it’s working. Hot water will automatically spray out from the shower head into the brew basket.
Step 8: Stir and Bloom
Once the brew basket is about half full with hot water, take a little wooden spoon or whisk. Gently stir it around. Your goal is to make sure the hot water mixes evenly across the bed of coffee grounds.
- Important note: Do not switch the Moccamaster off, or remove the brew basket at any time during this step. Hot water will still be pouring out!
As you do this, your coffee will “bloom”. Coffee blooming is when unwanted, excess gas is released from freshly ground coffee – which greatly improves a coffee’s final taste.
Step 9: Continue the Brew
Allow your coffee to bloom for about 30 seconds. Then, open the valve on the brew basket. Switch it to the “fully open” setting. On the brew basket, this is the “O” inside a circle symbol.
- Note: Again, skip this step if your Moccamaster does not have a brew basket switch.
Close the lid on the brew basket. With the valve opened, the rest of the hot water will start dripping down into the carafe below. Time it: it should take about 5-6 minutes before the brewing stops. The red light will automatically go out.
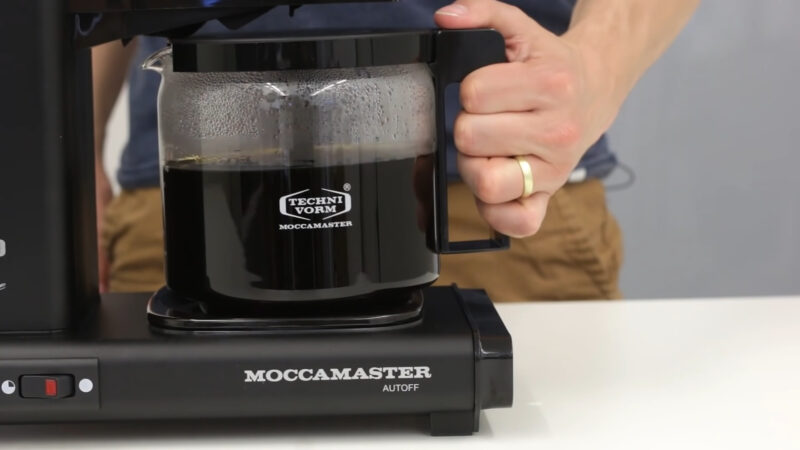
Step 10: Pour and Enjoy
Flick the power switch off. Your pot of freshly brewed Moccamaster coffee is ready. All that’s left now is to pour it into your favourite mug and sip on its delicious taste.
Don’t forget to clean it too. Chuck the filter paper into the compost bin, grounds and all. Take the Moccamaster’s brew basket and carafe out and give it a good rinse (do not run it through the dishwasher). Let it air dry, and you’re good to go.
How to Use a Moccamaster: Tips and Troubleshooting
As you can see, it really isn’t difficult to use a Moccamaster. This is one of the rare few drip coffee makers out there that is easy to use, yet gives you a great degree of control over the brewing process for yummy coffee. That said, it will still take some trial and error to truly fine-tune the nuances to get your optimal taste.
Here are some tricks to help you out. None of these are in any particular order. Use them as guides when playing around with your Moccamaster.
Dialling-In the Grind Size
The optimal brew time should be around 5-6 minutes. Slightly longer if you’re brewing a full batch, and quicker if it’s a half pot. Your grind size plays a big factor in the extraction of the coffee – too coarse, and it’ll taste sour; too fine, and it’ll be bitter and hollow.
Remember to aim for around a medium grind size. Once you’ve tried this, see if it works. If it does (which it usually does), great! If not, follow the troubleshoot below.
- If the hot water shoots through the bed of coffee grounds way too quickly, such as under 3 minutes, you’ll know it’s too coarse, and you’ll need to grind it finer next time. Aim for a medium-fine grind.
- If the hot water seems to get stuck, and the brew basket fills up and gets dangerously close to overflowing, coarsen up the grind next time. Aim for a medium-coarse grind.
When changing grinds, do so in small increments. Don’t crank the grinder from a coarse setting straight to fine.
Coffee Strength
If the already-brewed coffee is too strong for your liking, Moccamaster recommends adding some hot water to your cup. That way, you’ll dilute and weaken the coffee. Super simple, yet super effective.
If the coffee tastes a bit too weak, Moccamaster actually recommends straight out changing the coffee beans or roast level. This, I don’t necessarily agree with. Instead, this is a great opportunity to experiment with different brew recipes. The next section is where I’ll cover that (cue ominous music 2.0).
Eye on the Time
Your brewed coffee will stay hot in the carafe for quite a while, but even then it’s best to drink it when fresh and hot. If you leave it for an hour or two, it won’t taste nearly as good. And if you let it sit for hours, the coffee will oxidize and turn bitter.
Drink it up fast, folks!
Brew Smaller Batches
Don’t brew a full batch if you don’t have to. It’s better to brew it twice and enjoy fresh, amazing coffee, as opposed to brewing one huge pot and forcing yourself to finish it before it turns bitter.
On that note, keep in mind which Moccamaster model you’re using and how many cups it’s meant to brew. Don’t go too little either: don’t try brewing just one cup of coffee if you’re using a 1.25 L/10-cup Moccamaster model.
The Recipe Ratio: Part II

Now, just to recap, Moccamaster’s official recommended recipe is a 1:18 coffee ground to water ratio. This also happens to be the SCAA golden ratio. So you can be definitely certain it’s a solidly-founded recipe. Many brewers swear by it, and like I mentioned above, Moccamaster even goes as far as to discourage changing this ratio. This is what they say:
“If you find the final brewed coffee too weak for your taste, we recommend changing your coffee variety and/or roast profile; we do not recommend increasing the formula.”
US.Moccamaster.com
Thing is, the taste of coffee is something really subjective to each person. What I enjoy might not be to your liking. Which is why I don’t quite agree with this. It might be a bit controversial to stray a little from Moccamaster and the SCAA’s gospel, but I highly recommend experimentation!
Coffee is all about finding the taste you like best. We’re no longer confined to the dark roast ages of bad coffee beans. You are the one who will drink it in the end after all. Why not enjoy it to the fullest?
1:18 is a fantastic starting recipe to follow. Stick to this the first couple of times. But, once you’ve gotten the hang of your grind size, water volume and brew time, go on ahead to start playing with the ratio. Here are some alternatives:
- A common recipe for pourover and drip coffee is 1:16, where you use 62.5 g of coffee grounds to 1 L of water. This makes for a slightly stronger cup, where the flavours are more pronounced.
- A barista friend of mine whom I used to work with shared her thoughts on this. She said that the 1:18 ratio gives a final cup flavour that is reminiscent of tea – smooth but weaker; whereas a 1:16 or 1:17 ratio gives more kick to the coffee.
- I’d say an acceptable ratio range would be anywhere from 1:16 to 1:18. You could even stretch it as far as 1:20, if you prefer a very light taste.
What about scoops to cups?
Can I use that to measure my morning brew, since it’s so much easier?
Well, can you? Yes.
Should you? Nope.
What on earth is a “scoop”? How big a spoon are you using? Are you using a small teacup or one of those gargantuan 20 oz gift mugs? Sure, you can approximate, but it’s near impossible to get good, consistent tasting coffee if you opt for this approach. So my answer is nah.
Grams to litres still remains as the reigning champion.
FAQ

How often should I clean my Moccamaster?
It’s recommended to clean your Moccamaster after every use by rinsing the brew basket and carafe. A deeper cleaning to remove mineral buildup should be done every 100 brew cycles or at least once a month.
Can I use tap water in my Moccamaster?
Yes, you can use tap water, but if your tap water is hard, it’s better to use filtered water to prevent scale buildup and maintain the coffee maker’s longevity.
Is it possible to adjust the brewing temperature on a Moccamaster?
No, Moccamasters are designed to brew at an optimal temperature range (196°F – 205°F) for the perfect extraction, and this temperature is not adjustable.
Can I pause the brewing process to grab a cup?
Some Moccamaster models have a drip-stop feature that allows you to pause the brewing process, but it’s not recommended as it can affect the overall quality and taste of the coffee.
How long does the Moccamaster take to brew a full pot?
It typically takes about 5-6 minutes to brew a full pot, depending on the model and the amount of water used.
Can I use pre-ground coffee in a Moccamaster?
Yes, you can use pre-ground coffee, but for the best flavor, it’s recommended to grind your beans fresh before brewing.
Is the Moccamaster environmentally friendly?
Yes, Moccamaster coffee makers are durable, designed to last a lifetime, reducing waste. They are also made with recyclable materials and energy-efficient components.
Time to Crash!
That’s the end of this comprehensive Moccamaster crash course. It’s such a rewarding feeling when you take that first sip after all the hard work you’ve put into brewing. I hope you’ve found it useful, and have gained the newfound knowledge and confidence to switch that Moccamaster on.